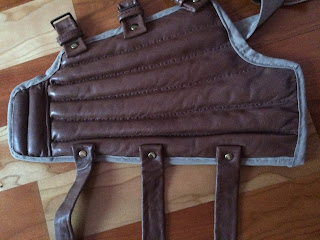
1. First of all I made the patterns of the armor and modified them until I was happy how they looked. This took some time to figure out. When I was happy with the patterns I cut them out on craft foam.
2. For my armor I used leather from a jacket that I found at a thrift shop for quite cheap. I just placed the craft foam peaces on top and cut out peaces that were slightly bigger then the foam peaces. For the arm peace I cut out two peaces, one for the wrist/ hand part and one for the arm.
3. Because the armor has this "bumps" I just took an old t-shirt and cut some strips out of it. I rolled the peaces and glued them on the backside of the leather peaces. Here a pic:
4. After I had glued all the peaces I started to pin the leather peaces on to the foam peaces.(Don't forget to do this to the leg peaces also!)
 |
| As you can see I made separate peaces for the hand parts |
 |
| sewing... I dont want to do that ever again. |
Here some pictures from when this part was done~
 |
| All of them done! Unfortunately we hove still some sewing to do.... |
 |
| This is what it looks like from the back |
6. So it was this when I stopped taking pictures because I was starting to get on a hurry to finish them.... But the next step was to make the knee pads. I made them out of thicker foam that I first covered with leather. Here a drawing of the process ... I hope you can make some sense from it.....
7. Then I just sewed them on the knee parts.
 |
| This is a picture from when I already finished them I also made some small holes in the back of the craft foam so the peaces wouldn't be too stiff. |
8. Now I started making the straps. I actually just cut some leather straps about 6 cm wide and glued the edges inside. I wound recommend sewing them but I didn't have time at the moment.
9. Then I just placed the straps where they belong: 3 In each arm , 2 On each leg and 2 on each knee part. And don't forget to make the other side where the straps are tightened and so on. I used glue and those paper holding things. as you can see on the pictures below: (again I would recomend sewing them)
 |
| I aded a small peace of leather to keep the straps on place. Like on a belt. |
11. And then I was finished! Yay! This was very time consuming! but I think it was worth the time!
I hope that This tutorial was helpful for someone! If you need help on something specific just write a comment down below!!❤️


Ei kommentteja:
Lähetä kommentti